
Building the Event Homepage
The event homepage is easy to build using the drag and drop page builder tool. You will see exactly how it will look to your visitors as you design it, and you can drag new elements right onto the page from the column on the right. There are a lot of settings available in this tool, but you can also just customize the existing template. When you click on an item in the email, the settings for that item will be displayed on the right, and you can type new content right on the page.
Click the Save button in the upper right of the page often as you work. Changes do not autosave as you work.
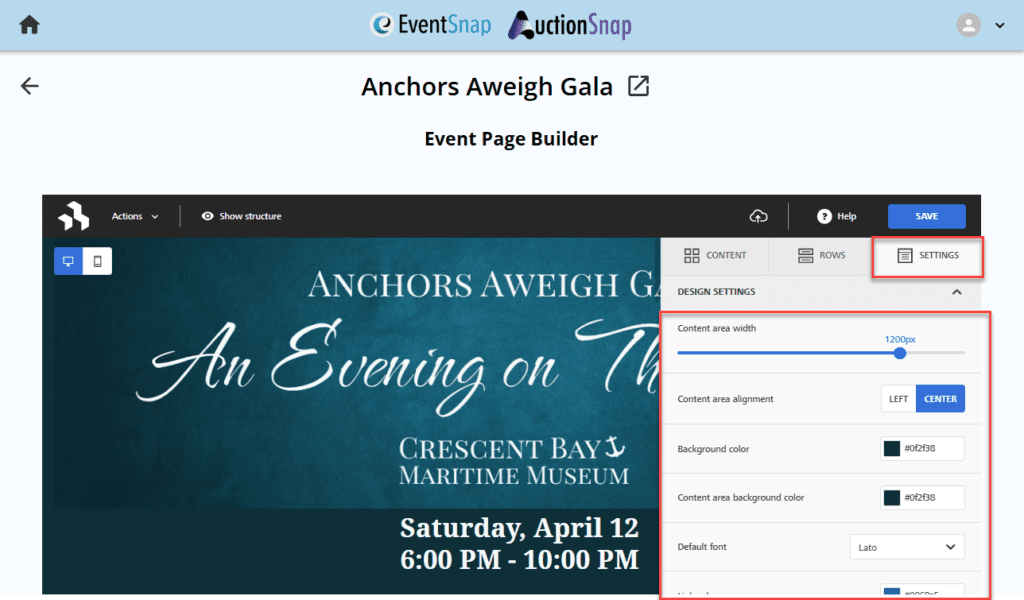
Main Page Settings
Click the Settings tab in the upper right to see the basic settings for your page. This is where you will control how wide the page content will be, background colors, default font and alignment, and link colors.
Row Structure
The basic building blocks of the page builder starts with a row. In order to add content into your webpage, you first need a row. You can use an existing row, or you can add a new row by clicking the Row tab to the right of the screen. Rows are made up of columns, and there are a few common row types that you can start with. Choose the row with the column structure that looks how you want it to be and drag it to the location you want in your page.

Click on the beginning or end of the row you just added (not the dotted lines section that says “Drop content blocks here”). You’ll see the settings for that row show up on the right now. You can change the background colors of the row, borders, spacing, alignment, column structure, and individual column settings here.

Column Settings
While you have a row selected you can adjust an individual column settings independently of the entire row. Scroll down in the settings on the right to find the Columns Structure section. Here you can see the columns of your selected row and add new columns. Click on the column that you want to edit the settings for and scroll down. Change the background color, padding, and borders here. Change the column widths by dragging the space between the columns
This is how you can change the box color of the default template that displays the date, location, and price. Click to the left or right of the “Drop content blocks here” section, scroll down the settings on the right, in the Columns Structure section, click the middle box of the three to select it and then change the background color.

Adding Content to the Page
Once you have at least one row in your page, click the Content tab of the menu on the right. Choose the content type that you would like to add to your page and then click and drag it into your row. Click on the new item you added and it will display that item’s settings in the menu on the right. You can type right on the page and adjust font formatting using the toolbar that appears near the text as you type.

Image Manager
Once you add an Image from the Content menu, you will see that you can click the browse button on the web page or choose the Change Image button in the settings menu on the right. This will open your site’s file manager where you can upload new images or select from existing ones you have used in the past.
When using the image manager, do not click the back arrow at the top of the page, or it will take you back to the event dashboard page and you will lose your unsaved work. Click the X in the upper right to close the screen and go back to editing your page.

Mobile Optimization
The page builder creates your web page in a responsive format, so it will automatically adjust to be displayed well on a phone. You can preview what it will look like on a phone using eht icon in the upper left of your page builder screen. The computer monitor icon is the default view, but clicking the phone icon will shrink the screen down. While you are in mobile view, you can adjust mobile only settings without affecting what it will look like on a desktop. You will not need to make changes here, but sometimes it may be helpful to change the font size on mobile view to fit the screen better.
Custom Event Registration and Auction Buttons
The default EventSnap setting is to display a button fixed to the bottom of the screen for visitors to enter your event store or your AuctionSnap auction. While the button text is customizable on the Event Settings page, the colors and font are not. If you do not want to use those default buttons, you can hide them in the Event Settings page and create your own directly in the page builder.
From the Content menu, drag a new Button onto your page where you want it. Click on the button to select it. Change your text and then use the menu on the right to adjust the settings. In the URL field, use https://[YourSiteCode].auctionsnap.com/[YourEventCode]/event/register but replace the items in brackets with your information. For the auction it will be similar using https://[YourSiteCode].auctionsnap.com/[YourEventCode].
Additional Help
For more information on how to use the page builder, visit https://docs.beefree.io/end-user-guide/builders/page-builder. Note that all features described on this third party help page may not be available in EventSnap.