
Event Reports, Name Tags, and Exports
Guest Information
Export a comprehensive list of your guest registrations to an Excel spreadsheet. This report will display one row per guest, with all of their ticket data. If a guest has multiple tickets, their tickets will be displayed in a combined view in the Ticket(s) column. The same is true of the Group(s) column. The first listed group will correspond to the first listed ticket. All user defined fields are displayed in the columns to the right of these. When the “Include System Fields” option is selected, the Attended field is displayed.
Managing Duplicate Guests
If a guest has multiple rows in the spreadsheet, then they have been created as multiple guest records. The system will still function well, and no action is necessary. Changing contact info in one of the guest records will not affect the other.
If you wish to combine them so that each person only has one guest record, you will need to merge them manually. Start by going to the Guest Registration screen, look up the guest name, and find the duplicate records. Rename one of the guests slightly by putting a 2 after the name field so that you can identify which one you want to get rid of. Check the information between the two records to make sure the contact info is the same. Next go to the Ticket Maintenance screen and search for the guest. Click the edit icon next to the records with the 2 after it and click the Reassign button to switch it to the guest you want to keep. Repeat as needed for all tickets assigned to the 2 contact. After all the tickets have been removed from the 2 guest, return to the Guest Maintenance screen and you’ll be able to delete it using the icon on the far right of that guest row.
Name Tags
For those needing a simple name tag without customization, EventSnap has a few built in templates to make it easy. If you would like to adjust fonts, colors, and other formatting, build your label lines and then choose the option to “Export All Fields to Excel” at the bottom, where you can build your name tags in Microsoft Word directly.
First select the ticket type you would like to create name tags for, and then choose your name tag size. Many name tag sizes share the same layout, so if you are using an Avery number not listed, it is probably compatible with the other numbers with the same dimensions.
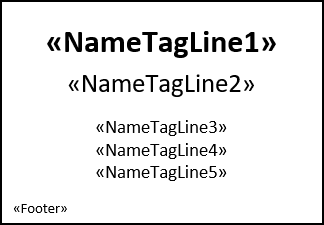
Each name tag template has 6 lines available for use. Each line has formatting specific to that line. Multiple fields can be included on one line. For example the First Name and Last Name fields can both be placed on line 1 and they will be separated by a space. The group and user defined fields have an additional option to include a prefix before the value to help clarify what that data is. The prefix is optional, but can be helpful in certain situations. The template formatting for each line is:
Line 1: Calibri, 24, bold, center aligned
Line 2: Calibri, 20, center aligned
Line 3: Calibri, 14, center aligned
Line 4: Calibri, 14, center aligned
Line 5: Calibri, 14, center aligned
Footer: Calibri, 11, left aligned in the bottom corner
When you have set up your label lines, choose to generate to Word, PDF or Excel. Generate to Word if you want to be able to edit anything before printing. This will allow you to change formatting or fix typos on the fly as needed.
When you generate your name tags as PDF, make sure you open your file using Adobe Reader, not your browser. Print your PDF at 100% scale or actual size. If you choose a zoom/scaling option other than 100% or actual size, your labels may be misaligned and print outside of your name tag boundaries.
Generate to Excel if you wish to use your own custom template. If you would like help getting started, the following templates can be downloaded and modified as needed for mail merging your name tags outside of EventSnap:
Groupings Report
Export a list of all groups and the guests that belong to each one. This report requires that you first select a ticket type and generate the report only for that type. If you wish to include any user defined fields, select those as needed.
Include Unregistered Guests – Unregistered guests are purchased tickets, but not currently assigned to a guest. They will show up with the purchaser name followed by Guest and a number. For example: John Smith Guest 1.
One Group Per Page – This option is specific to the PDF version of the report [Coming Soon]. This makes it easy to print a separate page listing group names if needed at your event. For example you may want to print the groups separately to put the names of your golfers on the golf carts they are assigned to.
Event Summary
The Event Summary report is a simple breakdown of how your event is running. It displays summary data for ticket/merchandise sales, guest registrations, attendance, and user defined summary. For example, if you need to know how many of each meal choice has been selected, this page will show it to you.
The Purchase Summary export will download a spreadsheet of two tabs, one for the summary, and another one for the details listing every item purchased. The summary tab includes data like the purchaser information, payment method, payment amount, additional donations and fees, and discounts. The detail tab lists the purchaser, items, quantity, and amount of all items purchased.