
Running Your Event – Manual Checkout, Maintenance, Emails, and Check In

Basic Definitions
When managing your event, make sure to distinguish between purchasers and guests:
Purchaser: The one using your event store to purchase tickets and merchandise. They physically pay for the items and receive an emailed receipt.
Guest: Someone that has been assigned to a ticket. One purchaser can buy multiple tickets and one guest is assigned to each of the tickets.
Tickets: The core of most events are tickets. They are used to track registration, attendance, and additional information like meal choices or t-shirt sizes.
Merchandise: Additional items for sale. The system will track quantity sold/available. Merchandise is not assigned to specific guests or able to have user defined fields.
Event Transactions
From the Event Dashboard screen, the Event Transactions button will show you all of the purchases that have been made through your event store. Each checkout will show up here. Click the shopping cart icon on the left of a checkout to review the details.
This screen is also where you can process a new checkout. Click the + icon in the upper left of the table to start a new purchase. Select the tickets and items desired and then fill out the payment and purchaser information. After checkout you will be able to register guests for each ticket as well. When using the admin checkout interface, you’ll be able to choose between Bill Me, Check, Cash, and Credit Card.
Ticket Maintenance

The Ticket Maintenance screen is where you can view all purchased tickets that have registration enabled and the guest registration linked to each one. Use the filter box above the table to view all of the tickets of a specific ticket type. Every ticket purchased will show up, even if a guest has not been registered for that ticket yet. In that case it will say “Guest 2,” “Guest 3,” etc.
Click the pencil/edit icon on the left to change the guest registration of a ticket. For an existing guest, only the user defined fields will be editable. The name, contact information, email, etc. is not editable on this screen for already registered guests. (Go to Guest Maintenance to edit that information.) To change the person a ticket is assigned to, use either the “Reassign a Ticket to Another Guest” or the “Unassign Ticket” buttons at the top of the screen.
If a ticket item does not have the “Link to Registration” setting enabled, then tickets for that item will not show up on this screen.
A complimentary ticket can be added from this screen as well. This method is used to give a ticket to someone without requiring payment. Click the blue “Add Complimentary Ticket” button above the table after selecting the appropriate ticket in the dropdown field on the right. Enter the guest registration details to finalize the ticket.
Once a ticket has been purchased, it cannot be deleted. If ticket is abandoned, you can increase the total number of tickets available or reassign to another guest to reach your maximum capacity. All payment processing refunds are handled directly in Stripe’s system separate from EventSnap.
Guest Maintenance

Browse the list of all guests registered for the event on this screen. Use the filter at the top to switch between All Guests and a specific ticket type. Edit guest information including name, email address, and contact information by clicking the edit icon on the left of their row. User defined fields associated with all ticket types are available for editing here as well. If a guest no longer has any tickets associated with them, they can be deleted by clicking the delete icon in the far right column.
Group Maintenance

The Groups feature is used to organize your guests into golf foursomes, table numbers, teams, and other types of groups. If a “Group of Tickets” item was purchased, then all of those tickets will automatically be assigned to a new group. Groups can be renamed by purchasers during the guest registration step of the checkout process. This screen allows you to rename existing groups, create new groups, and move guests into groups with a drag/drop interface.
When a standard “Ticket” item type is purchased, that ticket/guest will be assigned to the default group for that ticket type. Add a new group using the button in the upper right, and then you can click and drag a guest from the default group into the new group.
Delete a group by first removing all guests from it. Once it is empty, click on the trash can icon in the upper right corner of the group.
Send a link to update registration or a general mass email for event details. View the dedicated email page for detailed help building and sending emails from EventSnap.
| General – Purchaser | One email per email address, even if multiple purchases made. | Send mass emails to your purchasers for announcements or general information. Mail merge fields are limited to First/Last name fields. |
| General – Guest | One email per email address, even if assigned to multiple tickets. | Send mass emails to your guests for announcements or general information. Mail merge fields include First/Last name fields and TicketType to display all ticket info associated with the email address. |
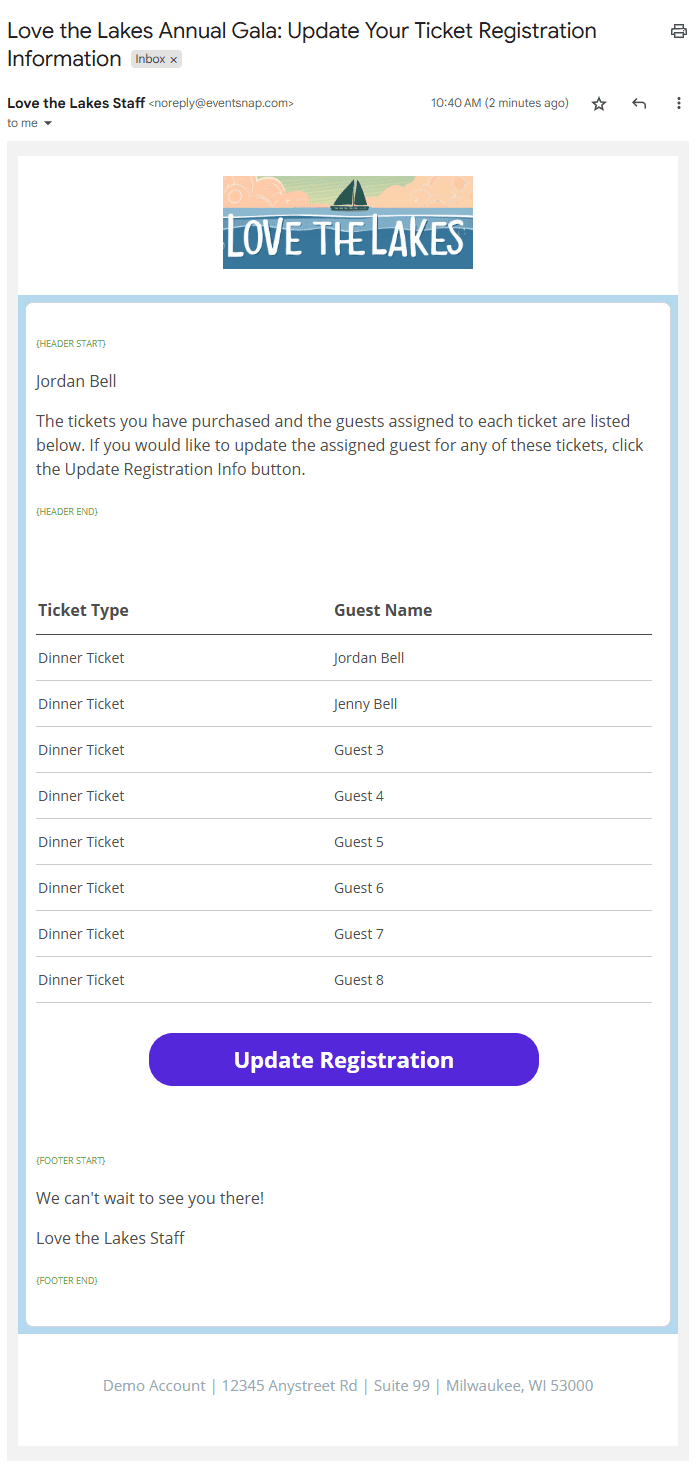
| Registration Update – Purchaser | One email per purchase. If multiple purchases made using one email address, multiple emails can be sent. | Send a link to your purchasers to update the guest registration associated with all of the tickets they purchased. |
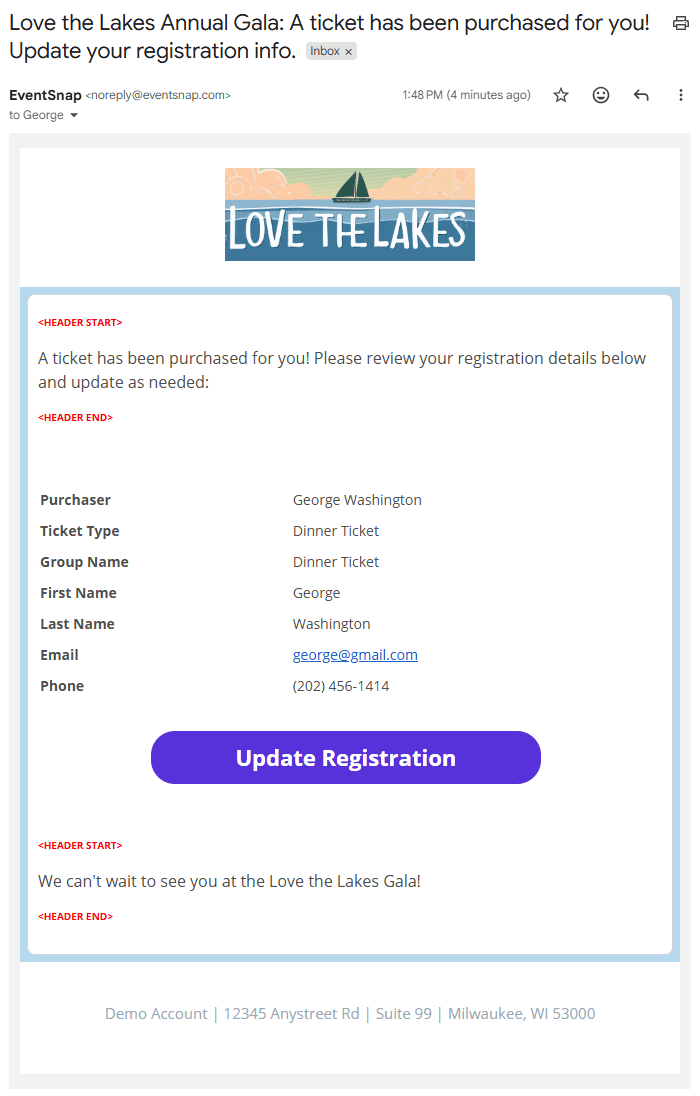
| Registration Update – Guest | One email per ticket. If multiple tickets use the same email address, multiple emails can be sent. | Send a link to your guests to update the guest registration associated with just their ticket. The email body will include all of the information on file for their ticket registration. |
Example Email: Registration Update – Purchaser
Example Email: Registration Update – Guest
Check In

To properly track attendance, the Check In page can be used at the event to quickly look up a guest and mark them as present. There are two settings an event can have for attendance tracking (selected in the Event Settings page): per event or per ticket. If a guest may purchase multiple ticket types and you need to track their attendance separately for each, then choose the “Track Attended per Ticket” setting in Event Settings.
If you are tracking attendance per event, the Select Tickets field will not be used. All of your ticket registrations will be displayed on the screen. If you are tracking per ticket, you must first select the ticket type you want to view to display them in the listing.
To check in a guest, click the Check In button on the left of their name. If you clicked the wrong one by mistake, click the Undo Check In button on the right side of the screen. If you want to check in a group of people in bulk, click the checkboxes on the left of their names and then click the Check In All Selected Guests button at the bottom of the page. Either method is acceptable.
If the guest of a purchaser shows up with a ticket but has not yet registered, search for the purchaser name. You’ll see something like “John Smith – Guest 2” and a Register button on the left. Click the Register button to fill out the guest information. Once you submit that information, it will automatically check in the guest as well.
Use the Status field at the top of the grid if you want to filter the listing based on checked in or not. By default, All is selected so you can see both.
Use the Search bar at the top right corner to search for a name. Type the name and and press tab or click the magnifying glass. (Do not press Enter or it will clear the search.) The results will be filtered when you stop typing. The search will include guest name, group name, and purchaser name in the results.
The listing table can also be sorted and filtered as needed. Click on the column heading to sort based on that column. When you hover your mouse over the column name, click the 3 dots icon on the right to add a filter for more complex searches.
Purchasing tickets at the door
If you are selling tickets at the door, you may wish to have a dedicated line for those people. From the admin side tickets can be purchased by going to the Event Transactions page. Click the + icon in the upper left corner of the listing table. Select the tickets and merchandise and move to the checkout screen. Enter the payment information and submit it. Finally on the registration page, the purchaser will automatically be assigned to the first ticket of each type. If you have user defined fields that need to be filled out, click the Edit icon on the left of the ticket to select them.
After the ticket has been purchased, switch screens to the Check In page to mark them as attended.
View purchases for a guest at check in
It may be best to generate a report of all purchases and provide that to your staff at the check in lines. Whether it be printed or a spreadsheet, that will show them a full list of the purchases made. This report can be found under Event Summary and then click the Export Purchase Summary button.
Alternatively, purchases can be found under the Event Transactions page. Look up the purchaser and click the shopping cart icon on the left of the transaction. This screen will show you all the items purchased.