
Running Your Event – Sending Emails

Mass emails can be sent to your purchasers and guests from EventSnap under the Event Activity section and then click the Email button. For a new event, this screen will be blank. Click the Add Email button to create a new email. Give the email a name for admin purposes and then choose the type of email.
Type of Email
You can choose between a general email and a registration update email. General is used for announcements or event updates, and only one email will be sent to a guest or purchaser even if they have multiple tickets or purchases. Registration Update emails will include a link for the recipient to update the guest registration for their ticket or the tickets they have purchased. One email will be sent for each ticket/purchase.
| General – Purchaser | One email per email address, even if multiple purchases made. | Send mass emails to your purchasers for announcements or general information. Mail merge fields are limited to First/Last name fields. |
| General – Guest | One email per email address, even if assigned to multiple tickets. | Send mass emails to your guests for announcements or general information. Mail merge fields include First/Last name fields and TicketType to display all ticket info associated with the email address. |
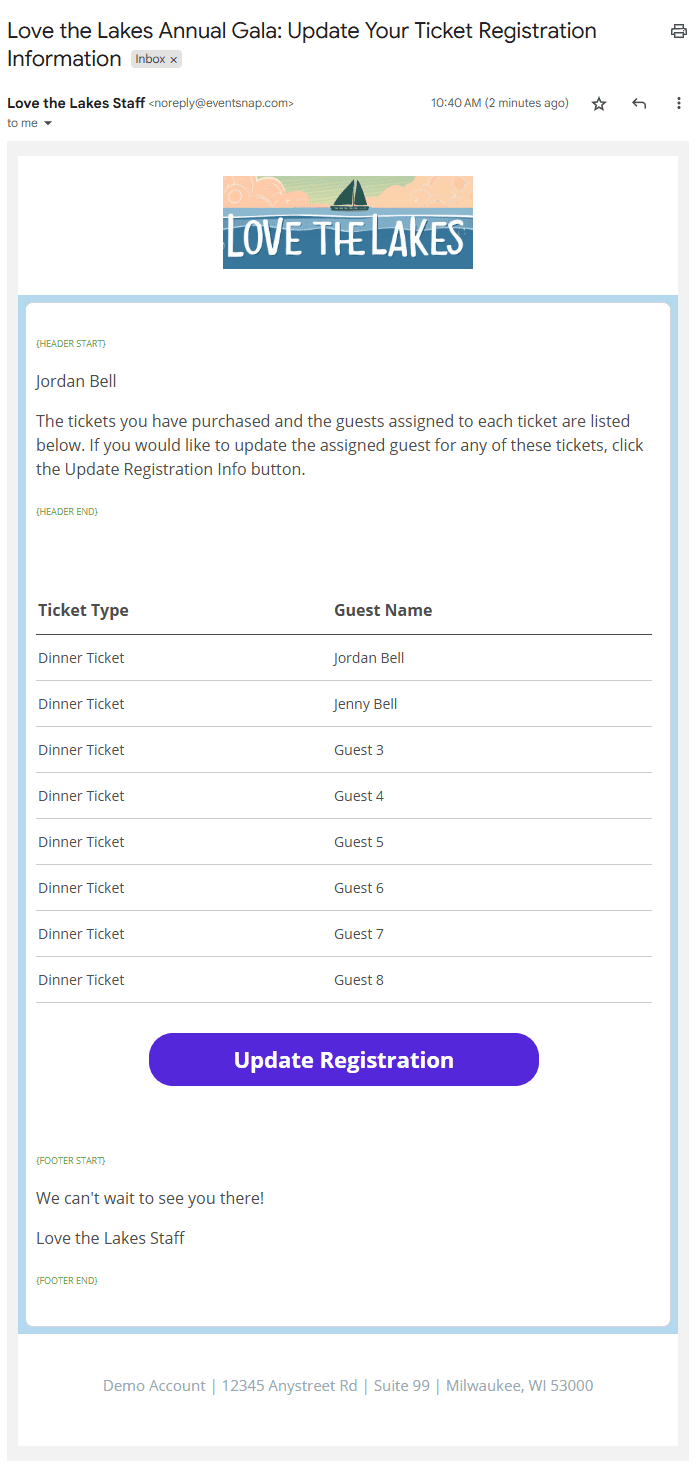
| Registration Update – Purchaser | One email per purchase. If multiple purchases made using one email address, multiple emails can be sent. | Send a link to your purchasers to update the guest registration associated with all of the tickets they purchased. |
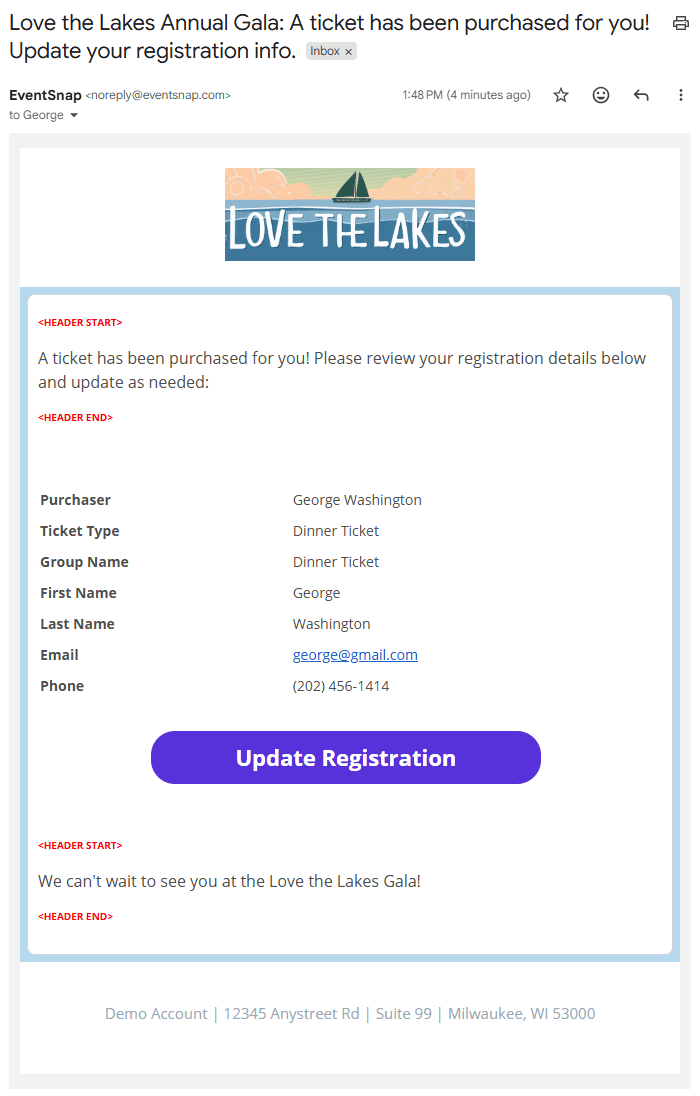
| Registration Update – Guest | One email per ticket. If multiple tickets use the same email address, multiple emails can be sent. | Send a link to your guests to update the guest registration associated with just their ticket. The email body will include all of the information on file for their ticket registration. |
Example Email: Registration Update – Purchaser
Example Email: Registration Update – Guest
Editing an Email
After you have added a new email in the Listing tab, select it by clicking on the row of the table for that email. Next click the Edit Email Body tab at the top. Enter your sender details at the top, subject line, and the email body below. Registration Update emails will have a header and a footer section. The button for the purchaser/guest registration update will be placed between the two sections.
To insert mail merge fields, click the +Field Codes button on the toolbar of the text editor. Select the field you want to add and it will be placed where your cursor was in the editor. These fields can also be moved by click and dragging them to a new location.
TicketType Mail Merge Field
When sending a guest email, the TicketType mail merge field allows you to include ticket specific information. Each ticket will be listed in a block along with the user defined fields and selection. Here is an example for Fred Smith who has two tickets at a golf event:
Ticket Type: (Fred Smith) Golfer
Shirt Size: Large
Handicap: +18
Ticket Type: (Fred Smith) Dinner
Meal Choice: Chicken
Inserting Images Into Email
Images that are hosted on your website (or the DonorSnap Image Manager) can be inserted into your email. Copy the image url of the image and then click the “Insert Image” icon of the toolbar in EventSnap. Put the image url in the Web Address field to generate the html for embedding the image. Only image file types .jpg, .jpeg, .png, and .gif are supported.
Select Recipients
Based on your email type, you will either see a list of purchasers or guests in the Recipients tab. Check the box next to each of the people you want to email. Some types of emails will automatically remove duplicates before it sends, even if you check multiple lines that use the same email address. General emails will always remove duplicates, and Registration Update emails will always allow sending to duplicates.
When using the filters for a column, it will not uncheck the existing selections. This means you can filter your data, check the boxes, and then filter again to keep adding to the selected recipients.
Make sure you click the Save button at the bottom of the page.
Review and Send Email (and send test emails)
Click the Preview button to see what your email may look like when sent. Since it is being previewed in a browser and not in the actual email inbox, it may look different that it will to your recipients. Always send a test before sending out your email. This preview system will show you the first few actual emails as they will send, including mail merge fields and links. It will not mail merge your personal information when you send a test to yourself. Put your email address in the bottom and click Send to send a test to yourself.
The Send Emails section displays a summary of your email recipients:
Total Record Count: This is the number of rows in your Recipients tab. If you have multiple tickets/purchases for one email address, they may show up as multiple records.
Selected Record Count: This is the number of boxes checked on the Recipients tab. It will count all of the checkboxes, even if you selected duplicate email addresses.
Email Count: This is the number of emails that will actually send. It may not match the number of selected records if sending a General email and there are duplicate emails.